How-to
How to Use OBS to Record

Caleb Leigh
Product Owner, Marketplace
June 17, 2023
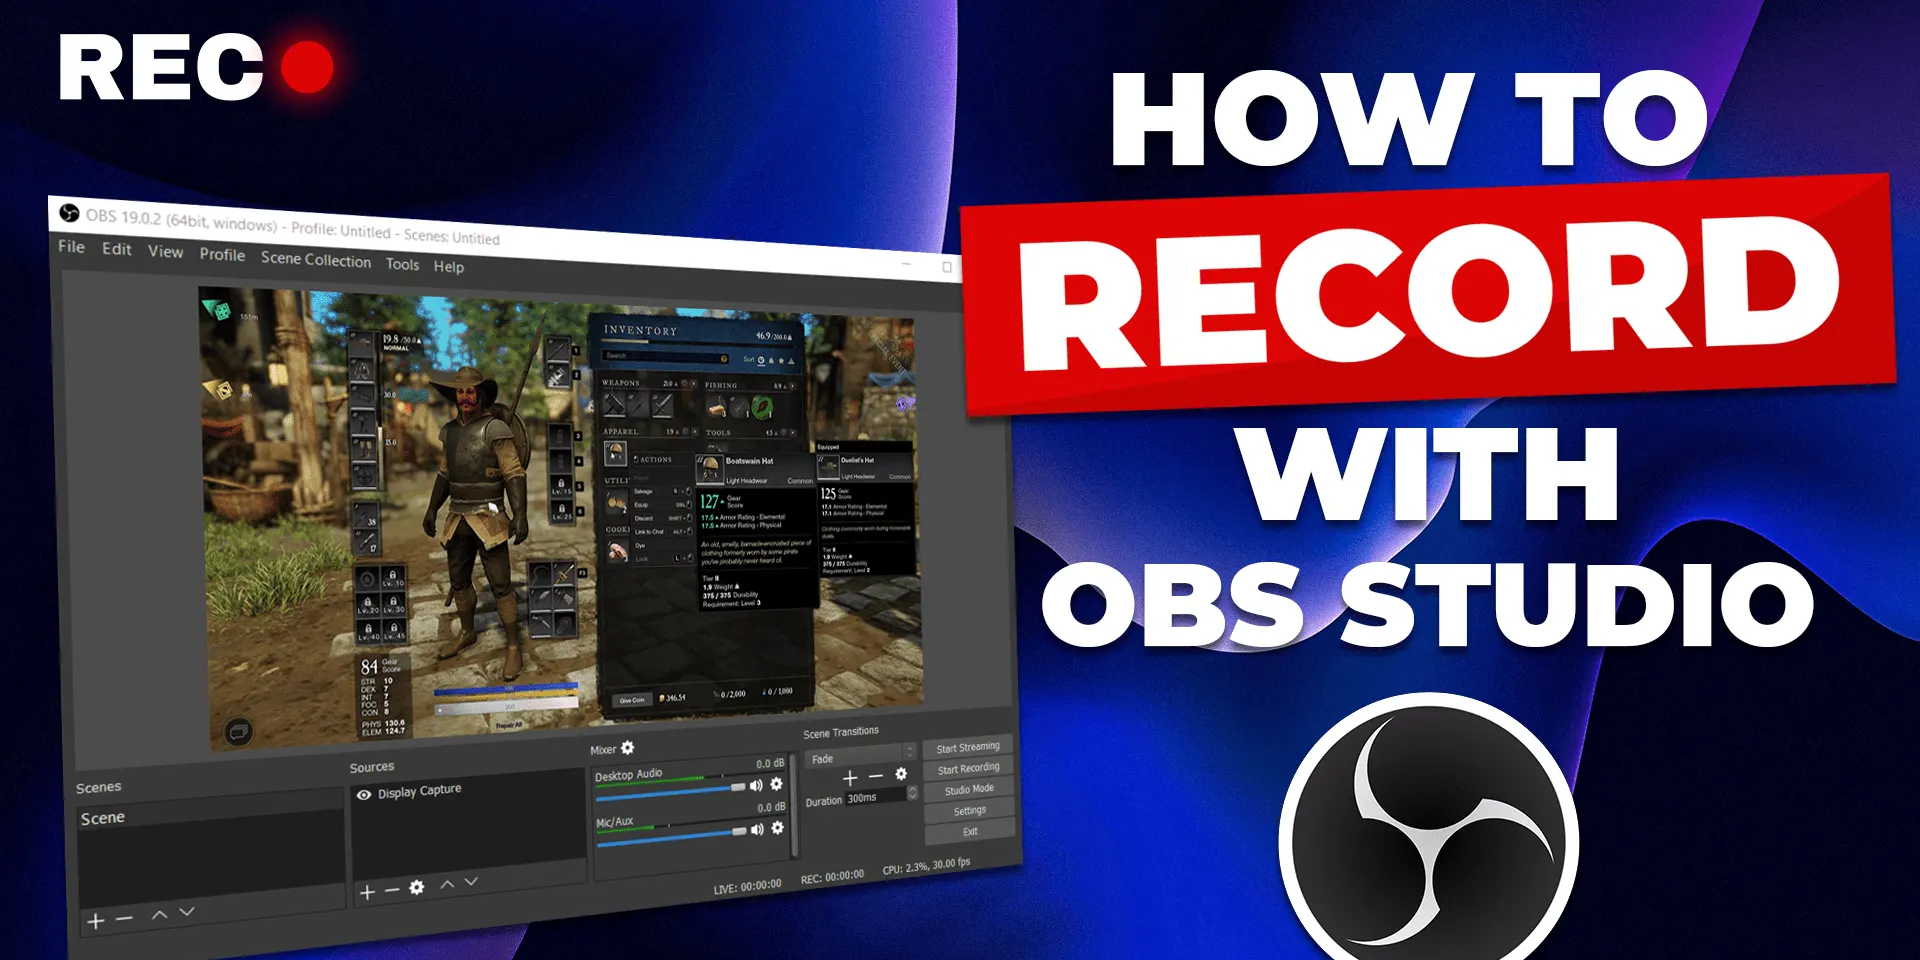
Want to find out how to record with OBS?
OBS Studio is one of the best broadcast applications out there. But did you know it’s also one of the best ways to record content? Creators often use OBS to capture video for later editing. You can use OBS to record whether you’re streaming or creating content offline; it’s flexible.
As streamers, it’s often beneficial to share content on other platforms. Saving a recording allows you to reupload it to YouTube or edit it down to other social media sites — like Instagram or TikTok (which require a different resolution altogether). In fact, generating content for YouTube or even IRL situations (need to record a presentation for work?) is a common use case for OBS Studio.
But before you do, you’ll need to know how to record with OBS. “It’s as simple as pressing ‘Start Recording,’ right?”
It can be, but we have a few methods that will ensure your content looks excellent. We also have a few tips to get the most out of your hardware while you record. This guide will get into the nitty gritty of getting the best recording you can out of OBS and your hardware.
Getting started – learn how to record with OBS
If you don’t have OBS Studio, you can find the application on their website. Download, install, and open it up. This guide is focused on getting you started with OBS configuration — with a focus on settings that benefit your recordings. It does help to have some basic experience with OBS, but we’ll point you in the right direction.
Setting it all up
Mastering your Video and Output settings is essential — especially if you want to know how to screen record with OBS.
Open the settings menu
In the lower right corner of your OBS screen, you’ll find the Controls Menu. Start by clicking Settings.
Select your video settings
Once in the Settings Menu, you’ll want to find the Video section.
In the Video Section you’ll have the following options:
Base (Canvas) Resolution:
A best practice is to set this to the resolution that matches your monitor, for example 1920×1080 (1080p).
Output (Scaled) Resolution:
This is the resolution of the expected stream or recording (i.e. what your viewers will see). When in doubt, set this to match your base resolution.
Downscale Filter:
This is only needed if your output resolution is less than your base resolution (for example, if you wanted to record at a lower 720p resolution). In this case, you’ll need to choose a method for it to downscale.
FPS:
Frames per second, typical value is 30 or 60. Going with 60 fps is great for smoother motion (i.e. a better viewing experience), but it can be demanding on lower-end PCs.
A word on the Downscale filters: both Bicubic and Lanczos are great options. Lanczos tends to look nicer but is more likely to impact your computer’s performance. Bicubic sacrifices a bit of quality but offers better performance. You can safely ignore Bilinear and Area. (Note: all of these downscaling options use your GPU, not your CPU.)
Our Recommendation: If sharing this recording on a site like YouTube, a common resolution for this kind of media is 1920×1080 with an FPS of 60. This also tends to match the resolution for most displays as well.
If you must downscale, consider using the Lanczos filter — as long as your computer can handle it. If performance is a concern, reduce the FPS to 30 and use the Bicubic filter.
Optimize your Output settings
Now that the resolution and fps are set, we’ll want to dive into some of the recording specific settings. Find the Output option on the Settings menu:
On this menu you can determine the individual settings for Streaming and Recording. Let’s take a look at what’s available.
Output modes
By default you’ll be in the Simple output mode. This is the option you see at the very top of the Output Menu. This is a simplified version of settings available for both streaming and recording. Let’s take a look at the section marked Recording.
Here’s a quick breakdown of the recording options, broken up by each setting available.
Recording path
The Recording Path is the location of the resulting video file. Tip: Recording video tends to slow down hard drives. If you have a second drive, consider recording to that one for better performance. SDD drives tend to perform better in this case.
Recording quality
This features a number of selections that compare recording quality versus file size. This is relatively straightforward: the better the quality of the recording, the larger the file.
Our recommendation – High Quality, Medium File Size tends to work for most setups, especially if you have limited hard drive space. It’s ideal to go with better quality if you have more space.
Some factors affect file size – length of recording, content of the video, and resolution. For longer recordings at higher resolutions, it’s possible to reach a file size that’s quite large (hundreds of gigabytes or more in a file) — especially if you chose indistinguishable or lossless quality. While there’s no hard number, try recording at High Quality to see how much space you take up — given your current resolution with the content you’re recording.
If you’re still unsure, consider switching from simple to advanced output mode (using the top dropdown). The recording options there offer more predictable file sizes, which we’ll cover later in this guide.
Note: what about “Same as stream”? This option pulls your selections from the Streaming output settings above — particularly bitrate, encoder and audio bitrate. We cover the bitrate and encoder options later in this guide, if you want to use the same settings for streaming.
Recording format
This one’s important – you have your choice of a few different formats, but we’ll cover the three most common:
mp4
is a popular format since it’s supported by the majority of software and devices.
mkv
is a video format that stores several audio and subtitle tracks in a single file. It’s popular for storing movies.
flv
is comparable to mkv, except it does not support separate audio tracks.
Only the first two formats—mp4 and mkv—support multiple audio tracks. For many creators this is an important distinction. It allows you to assign different audio sources—like your microphone, game audio, and background music—to separate tracks. This makes managing your audio much easier during the video editing process.
Our recommendation – mkv is the better choice here. In the event your PC or OBS crashes during a recording, mp4 files tend to corrupt easily — resulting in lost recordings. Selecting mkv (or flv) ensures you won’t lose a recording due to corruption. Trust us, this will save you massive headaches down the line.
If you still want to end up with an mp4 file, just record in mkv — then convert the file later using OBS’ remux feature.
If you’re fine using a single audio track, flv is a good backup option.
Encoder choice
So, what’s an encoder? Simply defined: it’s how OBS packages (or renders) data into a video format. Encoding can be done via your PC’s processor (CPU) or graphics card (GPU). The encoder you choose depends on your computer hardware. It generally falls into one of the options below:
x264:
This uses your CPU to encode the video. This is done at the software level, which can make it less efficient compared to other options. This is the most common option for most creators.
NVENC H.264 (new):
This uses your GPU and as you might expect, this option is available if you have an NVIDIA graphics card. This is a dedicated encoding chip on the graphics card.
AVC/H264:
Another GPU option, available if you have an AMD card.
Our recommendation: In general, if you have an NVIDIA card, using NVENC is the best way to go. Without going too deep into the comparisons, the NVIDIA cards tend to handle encoding much better than their AMD counterparts. If you have a fast CPU (or are using a two PC stream setup) x264 is a solid choice.
Note that x264 encoding tends to look better at lower bitrates (which we’ll cover shortly) while encoding done with GPUs handle higher bitrates much better.
Advanced Output mode settings
While using the Simple options gets you started, let’s talk about what we can do to get more control over our recordings. To get the best performance for your recording, change your output mode to Advanced from the top dropdown. Then click the Recording tab.
This panel allows for more control of our settings. Below we’ll cover some of the additional settings you’ll see while in advanced output mode.
Some of the options we’ve already covered in the previous sections. That information still applies here, below we’ll cover options that are exclusive to the Advanced mode.
Audio tracks
You can select which audio tracks you’d like the recording to pick up. If you’d like to exclude a given track, this is where you would make that selection. A good best practice is to add all tracks, then remove the ones you don’t need later during editing.
Encoder
We covered the finer points of your encoder above. However, advanced output goes one step further.
For one, you’ll unlock a bunch of extra encoder options. Note, these options will only appear if you select a recording encoder from the dropdown. If you leave it on the default “(Use stream encoder)” option, OBS will just copy over the encoder settings you’ve selected in the Streaming tab.
You can even select separate encoders for streaming and recording, if you’d like.
No matter your setup, we recommend manually selecting an encoder here. This allows you to fine-tune options specifically for your recordings.
Let’s run through a few of those options now.
Rate Control
While there are multiple options, the most common and best choices are either CBR or VBR.
CBR:
Constant Bit Rate. Keeps the data rate the same independent of what’s happening in the recording. This is the most popular rate control for streaming.
VBR:
Variable Bit Rate. Changes the data rate based on the activity on the screen. Not recommended for streaming, however much more attractive for recording.
Our recommendation – when it comes to recording, VBR tends to perform better. It offers better-quality recordings, while keeping file size at a decent, manageable size. Just make sure you’re using higher bitrates (which we’ll cover in a moment).
CBR may be the preferred option for streaming, but it falls short for recordings.
Bitrate
Choosing the bitrate is important – the higher the bitrate, the better quality of the video. Your selected bitrate highly depends on the resolution and framerate you would like to record at. A higher bitrate also means a larger file size.
Note that your hardware may limit your bitrate setting: so if your hard drive can’t keep up, the harder time your computer will have.
Our Recommendation – Bitrate is a tricky thing since it really depends on your recording resolution against your hardware. Some rules of thumb, however:
If you are recording at 720p and 30 fps, a bitrate range of 7,000 to 9,000 is excellent.
If you are recording at 1080p and 60 fps, a bitrate range 10,000 to 16,000 is the sweet spot.
For a more personalized recommendation, check out bitrate calculatorthis Twitch bitrate calculator.
Time to record!
So we covered a lot – setting your resolution as well as a number of tweaks to get the best recording we can.
Now it’s time to actually record. But how do we do that? On the main OBS Studio screen, find the controls menu in the lower corner. You should see a “Start Recording” button.
Clicking this button begins your recording. In fact, this button changes slightly once recording starts. It becomes a “Stop Recording” button — plus a Pause button appears. Clicking either will stop or pause, respectively.
That’s it! You’re now recording with OBS Studio. You’ll find your video file in the place you set during the “Recording Path” configuration.
Congratulations, you’ve now mastered how to record with OBS. Happy recording!
Related Content
Icon packs 101
Everything you need to know about Stream Deck icon packs.
How-to

Essential Graphics guide for After Effects and Premiere
Let’s talk Essential Graphics. One of the most powerful design tools you’ve never heard of.
How-to
Audio effects 101
Everything you need to know about Marketplace's audio effects.
How-to
Getting started with Stream Deck
Get the ins and outs of Stream Deck.
How-to
July 9, 2023

Track Matte Transitions – Upgrade your OBS Stingers
Want to get started with track matte transitions? If so, you may have many questions.
How-to

Plugins 101
Everything you need to know about Stream Deck plugins.
How-to
Twitch Graphics Size
Consider this the ultimate guide to Twitch graphics size — and the bible for creative-types.
How-to
What’s new in OBS 27.1?
OBS Studio’s much-anticipated update—OBS 27.1—is here. Its release sent shockwaves through the st
How-to
Use multi actions to do more with less
With multi actions, carry out several actions with a single Stream Deck key.
How-to